Hotkeys, remapping, and the macro rabit hole
How I use AutoHotkey to boost my productivity, improve software usability, and make my life easier.
Have you ever found yourself repeatedly performing the same actions on your computer? Do you constantly reach for your mouse to navigate through menus until you locate the specific task you want to accomplish? Worse still, have you ever worked with software that doesn't allow you to customize your keyboard shortcuts—such as Adobe XD or Photoshop actions, which are restricted to the F1-F12 keys? If so, today's post is dedicated to you.
AutoHotKey Pro (commonly known as AHK) is a robust scripting language and automation tool designed for Windows (discussions about Linux and Mac will follow). It enables you to create custom scripts ranging from basic key remapping to intricate actions with branching logic. AHK Pro can be as straightforward or intricate as your needs dictate, but one thing is certain—you'll find it indispensable and worth incorporating into your workflow.
But, how does it work?
After downloading and installing AutoHotKey, you can begin by creating a .ahk file in your preferred integrated development environment (IDE) and start typing commands or remappings. The syntax is quite simple; personally, I use VS Code with the AutoHotkey Plus extension installed.
I've been using AHK for many years, and while I may not be an expert in all the advanced functionalities it offers, I've utilized it enough to meet my daily automation and remapping requirements. In this post, I'll explore some real-life use cases for AHK and provide tips on organizing your workflow.
A bit about me
As someone deeply passionate about graphic design, 3D modeling, and illustration, I find myself heavily reliant on the mouse for numerous actions. Much like Vim users detest shifting their hands to reach for the mouse, I share a similar sentiment when it comes to moving my right hand from the mouse to the keyboard—except for the essential shortcuts easily accessible with my left hand (e.g., Ctrl+W, Ctrl+Shift+A).
The challenge with using a mouse lies in its limited number of buttons, generally speaking. I'm particularly fond of mice equipped with multiple buttons, allowing me to execute a myriad of actions without the need to shift my hand away from the mouse. This proves especially beneficial when immersed in design work, 3D modeling, and other creative endeavors.
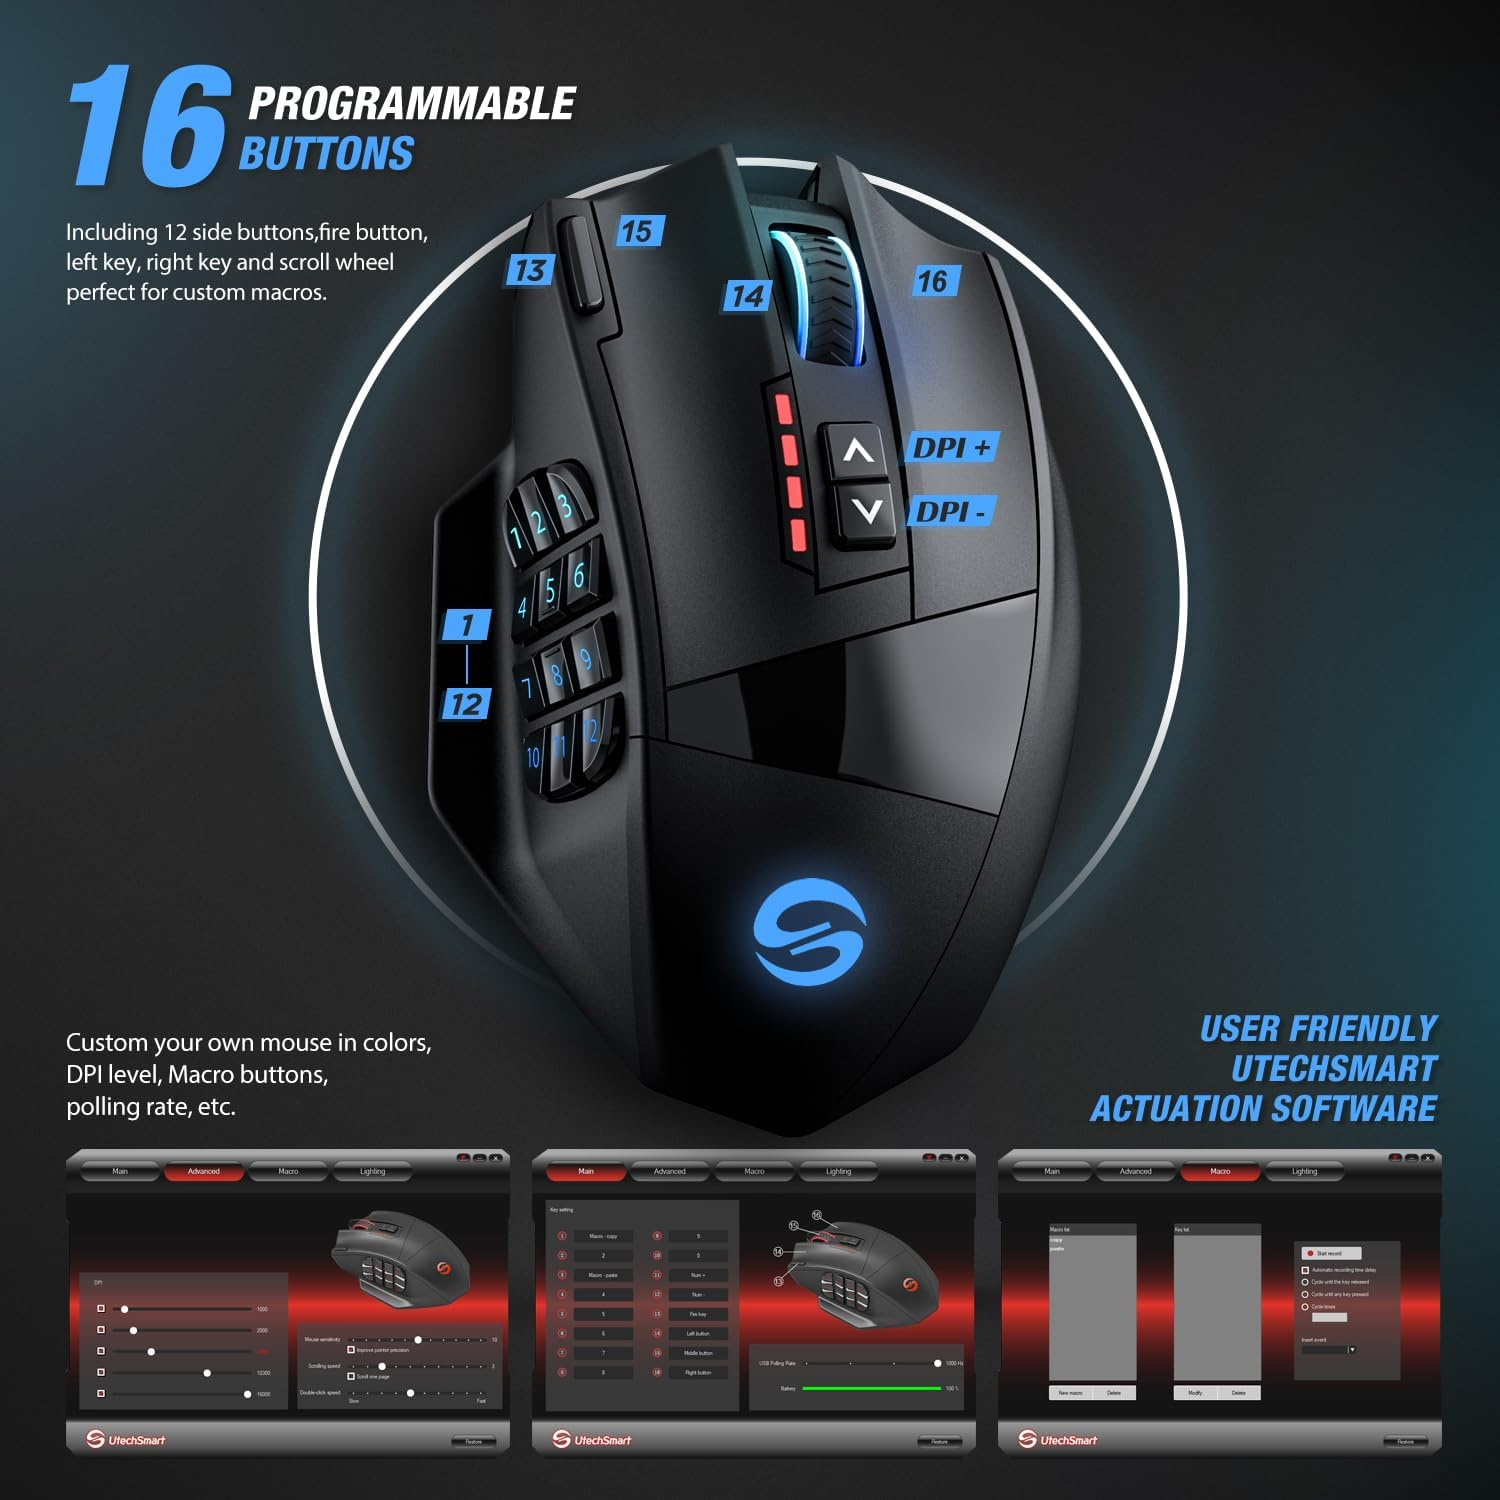
I use a mouse similar to the one depicted, although the futuristic Tron-like aesthetics may not appeal to everyone, the functionality it offers is exceptional. There are various alternatives from different brands in this niche market, providing ample choices. My primary recommendation in this regard is to opt for something ergonomic, with an emphasis on more buttons for enhanced functionality.
Come up with a plan for your shortcuts and remappings
A common hiccup you'll encounter when diving into remapping and macros is the frequent forgetting of your shortcuts. It's all too easy to find yourself revisiting your script file to jog your memory. The goal here is to minimize this inconvenience as much as possible. To achieve this, it's crucial to devise a cohesive set of shortcuts that not only make sense but can also be seamlessly translated for use across different software applications. In the examples that follow, my focus will mainly be on design apps like Illustrator, Figma, and Blender, among others. However, keep in mind that you can apply these principles to virtually any software.
Let's paint a picture of working with Illustrator in this example. One common trap you might stumble into is configuring your mouse settings directly for the keys you want to use in Illustrator. For instance, in the mouse software, you might be tempted to remap the 6th button to launch the Pen tool (which is, by default, mapped to the letter 'P').

Although this method works, it comes with a significant drawback—one that some of you may have already anticipated. The '6 Button' on your mouse will always be linked to the 'P' key on your keyboard, no matter which software you're using. While this mapping might be perfect for Illustrator or Photoshop, you'd probably prefer a different configuration for another software. While you could set up a second remapping inside AHK for each software individually (meaning that in Blender, for example, the '6 Button' triggers the 'P' key, and then the 'P' key gets translated to something else for Blender through AHK), this approach adds another layer of abstraction, making it more challenging to understand the scripts. My recommendation here is to set your default mouse buttons to something consistent, making sure it's logical and won't interfere too much with your workflow.
For me, I find that setting the 1-12 buttons on the mouse to correspond to the F1-F12 keys works well. Initially, this may not serve a specific purpose, but we can easily address this through AHK Pro. For instance, in this example, we could remap F6 to be the 'P' key in Illustrator and Photoshop, but assign it to something different in Blender. However, when reading 'F6' in your script file, it's clear that we're referring to the (6) button on our mouse.
As for the + and - DPI buttons at the top, I've set them to mimic the + and - keys on the numpad. Additionally, the small button at the top left of the mouse is configured to act as the Delete key.
Another crucial point is that you should try to avoid custom keyboard shortcuts set within the software itself as much as possible. In other words, strive to stick to the default shortcuts provided by the software (like Photoshop, Illustrator, Blender, etc.) and perform your remapping primarily in AHK. This approach offers several benefits:
- Provides a single source of truth, your script file, where you can quickly glance at your shortcuts.
- Importantly, it's easily shareable across different computers. This means you only need to copy one file when setting up a new environment.
Even though some software allows you to export customized keyboard shortcuts (like Photoshop), dealing with various workflows for exporting/importing shortcuts across different software and managing multiple files for each can be cumbersome. This becomes especially tiresome when transferring and keeping these files updated between computers. There's a good chance you might forget something and lose your shortcuts for a software, requiring you to reconfigure them.
By consolidating your shortcuts (or as many as possible) within your .ahk file, you can effortlessly transfer that file to a new computer. Better yet, you can create a GitHub repository with your .ahk files, ensuring that you can quickly replicate your configuration on any computer.
Keep your shortcuts consistent
A key strategy for setting and easily remembering your shortcuts in the long run is to assign some abstract functionalities to specific buttons consistently. Regardless of the software—whether it's Photoshop, Figma, Illustrator, Adobe XD, Blender, or any other—I usually designate the (1) button for selection, (2) for locking/unlocking elements, (3) for visibility (like hiding or revealing layers), (4) for copying/cutting, and (5) for pasting, and so on. This ensures that, no matter the application, pressing (3) will consistently hide whatever is selected. It's a massive time-saver that streamlines your workflow. Also, strive to keep your modifier keys (Control, Shift, Alt...) as consistent as possible. For example, adding Alt to a shortcut should probably perform the inverse of the original shortcut, so if (3) hides a layer, Alt + (3) should probably reveal whatever was hidden.
While this approach depends on personal taste and the specific tasks you plan to perform, grouping similar functionalities together significantly enhances your efficiency.
Let's start making some shortcuts
The first and most obvious step we can take is to begin remapping, ensuring that when a specific key (or combination of keys) is pressed, a different set of keys is sent to the program. Here's how you can do it:
^+!F6::
    Send, +p
return
So, what's happening here? Let's break it down, shall we? The first line (^+!F6) tells us what will trigger the action. In this case, it occurs when pressing Control + Shift + Alt + F6:
^= Control+= Shift!= Alt
The :: represents where the actual "shortcut" or action begins. Think of it like an opening curly brace { in many other programming languages. The return denotes the end of the shortcut or action, akin to a closing curly brace in other programming languages.
Inside the command, we can do whatever we want, including multiple actions. For our remapping purposes, we'll mainly use the Send command. As the name implies, it allows us to 'hijack' that set of keys and send something different to our computer. Whatever comes after the comma is what we send to the OS, and the same rules apply with the modifier keys. In this example, when pressing Control + Shift + Alt + F6, the program will interpret it as if we've pressed Shift + P instead.
Additionally, we can add comments anywhere by using ;. This works just like adding // or # in many other programming languages, as it ignores whatever comes next. I strongly recommend writing a short comment for every action or remapping, as it will greatly help you remember what you're doing when you revisit it after a few days.
;fit selected
F1::
    Send, +2
return
Making your shortcuts software specific
At the moment, in the example above, the (1) button will consistently perform the same action regardless of the software in use. This, of course, somewhat defeats the purpose. To address this, we will employ the #IfWinActive directive, enabling us to customize where certain shortcuts are triggered:
#IfWinActive ahk_exe Figma.exe
F6::
        Send, p
    return
!F6::
        Send, l
    return
As evident, the IfWinActive directive ensures that the subsequent actions only take effect if the .exe we are using is Figma. This directive works from top to bottom, meaning it applies to all the commands following it. If we want some commands to apply to every software, we just need to add #IfWinActive with nothing after that:
#IfWinActive
F4::
    Send, +c
return

F5::
    Send, +v
return
There are various ways to select the window you want to use, such as ahk_class, but for now, ahk_exe will suffice. I strongly recommend checking out the AHK Pro Documentation for detailed information and numerous examples.
AHK comes with the 'Window Spy' functionality by default. When you create a script and save it, you can start using it by double-clicking the script. You'll notice a new icon appearing in your taskbar, representing your script. Right-clicking on it reveals additional functionalities, including refreshing the script (in case changes were made), pausing, closing it, and more. One of these options is called 'Window Spy,' which opens a window showing you:
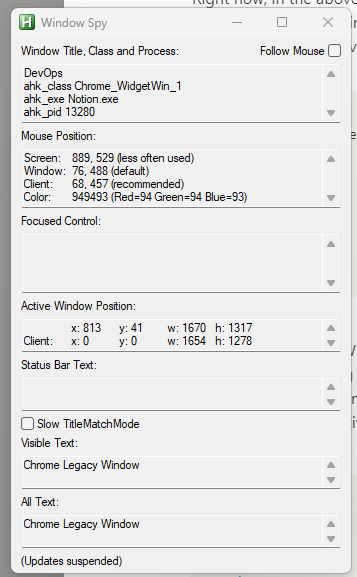
This will display information about the currently selected window, providing details like ahk_class or ahk_exe, helping us identify the program to which we want to constrain our shortcuts.
Another recommendation, especially as your script grows larger, is to stick to having one file for each program:
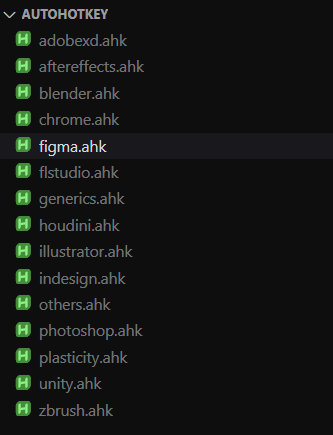
This does present a problem, though. Does it mean that if we want all shortcuts active, we need to open numerous scripts, clutter our taskbar, and have them all start automatically with Windows? Fortunately, no. We can have a 'master' script that 'includes' them all, and simply add that script to our Windows Start Folder. Here's mine for reference:
#NoEnv ; Recommended for performance and compatibility with future AutoHotkey releases.
#Warn ; Enable warnings to assist with detecting common errors.
SendMode Input ; Recommended for new scripts due to its superior speed and reliability.
SetWorkingDir %A_ScriptDir% ; Ensures a consistent starting directory.
#Include %A_ScriptDir%

#InstallKeybdHook

tabletMode=0
changingSize=0
unitySearch = 1

; GENERIC ------------------------------------------------------------------------
#Include C:\Users\pinoa\Documents\AAlex\scripts\autohotkey\generics.ahk

; CHROME ------------------------------------------------------------------------
#Include C:\Users\pinoa\Documents\AAlex\scripts\autohotkey\chrome.ahk

; FL STUDIO ------------------------------------------------------------------------
#Include C:\Users\pinoa\Documents\AAlex\scripts\autohotkey\flstudio.ahk

; UNITY----------------------------------------------------------------------------
#Include C:\Users\pinoa\Documents\AAlex\scripts\autohotkey\unity.ahk

; ILLUSTRATOR----------------------------------------------------------------------------
#Include C:\Users\pinoa\Documents\AAlex\scripts\autohotkey\illustrator.ahk

; ADOBE XD----------------------------------------------------------------------------
#Include C:\Users\pinoa\Documents\AAlex\scripts\autohotkey\adobexd.ahk

; AFTER EFFECTS----------------------------------------------------------------------------
#Include C:\Users\pinoa\Documents\AAlex\scripts\autohotkey\aftereffects.ahk

; PHOTOSHOP----------------------------------------------------------------------------
#Include C:\Users\pinoa\Documents\AAlex\scripts\autohotkey\photoshop.ahk

; INDESIGN----------------------------------------------------------------------------
#Include C:\Users\pinoa\Documents\AAlex\scripts\autohotkey\indesign.ahk

; BLENDER----------------------------------------------------------------------------
#Include C:\Users\pinoa\Documents\AAlex\scripts\autohotkey\blender.ahk

; FIGMA----------------------------------------------------------------------------
#Include C:\Users\pinoa\Documents\AAlex\scripts\autohotkey\figma.ahk

; ZBRUSH----------------------------------------------------------------------------
#Include C:\Users\pinoa\Documents\AAlex\scripts\autohotkey\zbrush.ahk

; HOUDINI----------------------------------------------------------------------------
#Include C:\Users\pinoa\Documents\AAlex\scripts\autohotkey\houdini.ahk

; PLASTICITY----------------------------------------------------------------------------
#Include C:\Users\pinoa\Documents\AAlex\scripts\autohotkey\plasticity.ahk

; OTHERS----------------------------------------------------------------------------
#Include C:\Users\pinoa\Documents\AAlex\scripts\autohotkey\others.ahk
As you can see, the #Include directive enables us to import all the shortcuts and actions from another file, simplifying the process.
While we've only scratched the surface of what we can do with AHK, this should be enough to kickstart your macro journey. Now, I'll provide you with some examples of things I do with AHK and how to set them up in your scripts, or simply give you ideas for useful functionalities.
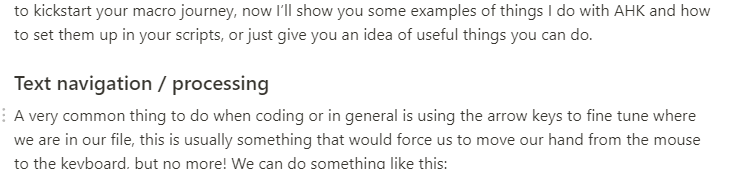
Text navigation / processing
A common practice when coding or working in general is using arrow keys to fine-tune our position in a file. Typically, this would require us to move our hand from the mouse to the keyboard, but not anymore! We can achieve this by implementing something like the following:
; Mousewheel key control

    ^WheelDown::
        Send, {Left}
    return

    ^WheelUp::
        Send, {Right}
    return

    ^+WheelDown::
        Send, {Down}
    return

    ^+WheelUp::
        Send, {Up}
    return
Combining this with F4 (where Alt+F4 is utilized for cut), the Del key (Shift+Del is configured for regular removal, allowing deletion both forwards and backward), and F5 for copying and pasting, we can accomplish various tasks in our text files without the need to shift our hands!
Closing tabs with middle mouse button
One feature I've always appreciated in browsers like Chrome or Firefox is the ability to close tabs with a simple middle click. This eliminates the need to pixel-hunt the close button or select tabs before pressing Control+W.

However, I was disappointed to discover that Illustrator and Photoshop didn't support this functionality. So, I created this script:
MButton::
        mousegetpos, x, y
        if(y>73 and y<98){
            Click, Right
            Sleep, 50
            Send, {Down}
            Send, {Down}
            Send, {Enter}
        }
        else{
            Send, {Enter}
        }
    return
This script enables us to detect the mouse's position and, depending on its y-coordinate, perform different actions. Keep in mind that this will vary based on your monitor resolution and how you've set up your software. While you could implement some smart math to dynamically get the screen resolution, this approach suits my use case. Essentially, when we right-click a tab in Illustrator, we get this context window:
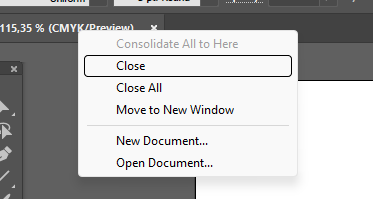
We press the down key twice after a brief delay (to prevent pressing the keys before the context window has finished loading) and then select the Close button, but only when the mouse is inside that vertical region. Instead of sending Control+W, we could directly close the tab. The advantage of this approach is that it closely mimics the behavior of internet browsers, allowing us to close a tab without having to switch to it first:

Media playback
We all enjoy listening to music while we work, right? However, there's nothing more annoying than having to click multiple times to adjust the volume or skip a song. Fear not! With this snippet, we can take care of that:
^!+LButton::
    Send, {Media_Prev}
return

^!+RButton::
    Send, {Media_Next}
return

^!+MButton::
    Send, {Media_Play_Pause}
return

; volume control with mousewheel

^!+WheelDown::
    Send, {Volume_Down}
return

^!+WheelUp::
    Send, {Volume_Up}
return
Now, while pressing Control + Shift + Alt, our mouse unlocks a plethora of functionalities to control volume, and pause or skip music.
What's next?
Obviously, there are many more things you can do with AHK. It's one of those tools where the sky is the limit, and it really depends on your workflow and the tasks you handle daily. Regardless of your work, I'm confident there are many aspects you could automate. Here is a link with some more examples you can check out. I encourage you to explore the official documentation, start experimenting, and have fun making your daily life more efficient! 😊
So... what about Linux and Mac?
While it's true that AutoHotKey Pro is only available for Windows, I've had a lot of success using AHK_11 in Linux. Scripts may need some slight modification, but the core remains the same.
For Mac, there are many tools that you can use to automate your workflow. Although none work exactly like AHK, I'm sure you can find the one that suits you. Here is a list for more information.
If you enjoyed this blog post and have any suggestions, you can contact me on LinkedIn or Twitter. I spent a good while writing this, so any feedback is appreciated. If people like this, we could maybe create a part 2 exploring more complex examples.